Inhaltsverzeichnis
Wi-Fi with eduroam
As a member of the University of Freiburg, or guests from the eduroam network, you can use the widely available Wi-Fi with the network name eduroam.
If you haven't set a password for eduroam or have forgotten it, set it in MyAccount.
Windows 11
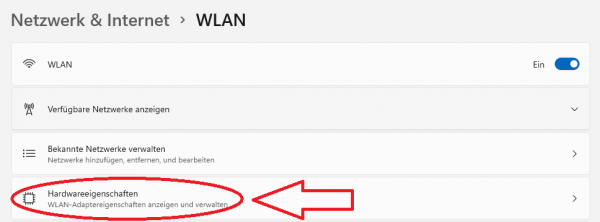
Open the window: Settings/System/Network & Internet/Wi-Fi, or use the mouse to hover over the airplane icon in the taskbar (turn Wi-Fi on) and access the Wi-Fi menu. Under „Available Networks,“ choose eduroam.
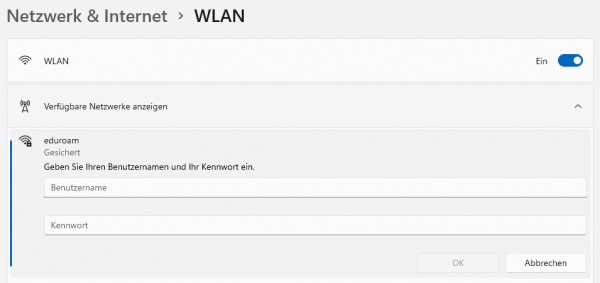
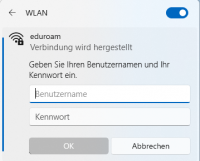 Enter your MyAccount ID as the username with „@uni-freiburg.de“ (NOT the email address with „@XYZ.uni-freiburg.de“) and the eduroam password. Connect if the offered (server) certificate is from radius.uni-freiburg.de. You are now connected to eduroam and have access to the internet.
Configuration options in the Windows 11 Wi-Fi menu:
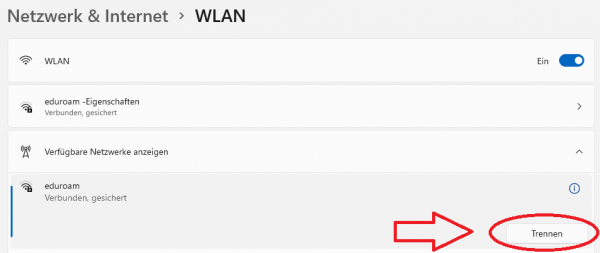
Under „Show Available Networks,“ you can disconnect the eduroam connection using the „Disconnect“ button.
Under „Manage Known Networks,“ you can delete the eduroam connection with the „Forget“ button.
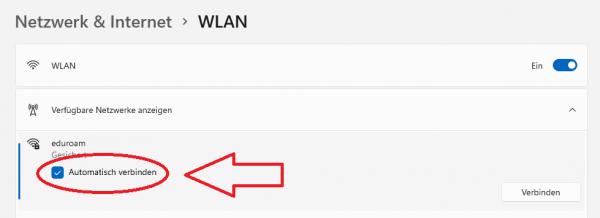
If you don't want your device to automatically connect to eduroam, uncheck „Automatically connect“ during configuration.
Provide the information in the „Hardware Properties“ menu for analysis if you experience issues with the eduroam connection.
Windows 10
Connect to the Wi-Fi network eduroam, if it is nearby, essentially as described for Windows 11 via the taskbar.
Configuration options via the command line in Windows 11 / 10:
If you want to change eduroam settings in Windows 10 and it is not within range, use the command line. Access the command line by typing „cmd“ in the search. You can make settings using the „netsh wlan“ command, some of which are presented in the following lines:
- Windows 11 / 10 - eduroam user data is requested, but no connection is established.
⇒ Authentication may not be possible because there is a problem with the certification chain. Install the root certificate (Root Certificate), the DFN-PCA certificate, and the UNI-FR-CA certificate from the DFN website: https://pki.pca.dfn.de/dfn-ca-global-g2/cgi-bin/pub/pki?cmd=getStaticPage;name=index;id=2&RA_ID=4160 and try connecting to eduroam again.
- Windows 11 / 10 - eduroam user data is not requested, eduroam is found, but no user data request occurs after clicking.
⇒ Update your Wi-Fi card driver through the Device Manager before further analysis.
- Transfer profile data from another device:
⇒ Import the eduroam Wi-Fi profile from a working system: You can view the Wi-Fi profiles using the command prompt:
| netsh wlan show profiles |
Then export the Wi-Fi profile:
| netsh wlan export profile name=eduroam |
Then import the profile on another Windows system:
| netsh wlan add profile filename=„WLAN-eduroam.xml“ user=current |
„WLAN-eduroam.xml“ is an example of the filename that was previously exported.
The words user=current mean that only the currently logged-in user imports eduroam. If you leave it out, the eduroam profile will be available for all created users.
- Windows 11 / 10 - eduroam password not automatically connecting
| netsh wlan set profileparameter name=eduroam connectionmode=manual |
- Windows 11 / 10 - eduroam password not saved:
| netsh wlan set profileparameter name=eduroam cacheUserData=no |
- Optimizing WLAN connection for 5 GHz WLAN:
In addition to the classic WLAN frequency over 2.4 GHz, almost all WLAN access points also transmit in the 5 GHz band. Due to the much higher stability and higher data throughput, we recommend using the 5 GHz band.
⇒ If you have a WLAN card from Intel installed in your notebook, proceed as follows:
Select the WLAN adapter and go to its context menu.
Select „Properties“ and then the „Network“ tab.
Press the „Configure …“ button and select the „Advanced“ tab.
In the „Property:“ list, adjust the value „Preferred Band“:
In the default setting, there is no setting.
Set the value to „Prefer 5.2 GHz band“.
Apple macOS
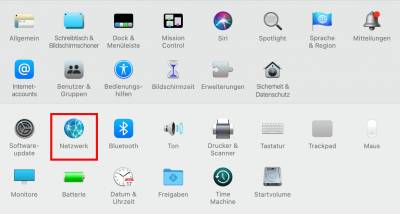
Select Network in System Preferences:
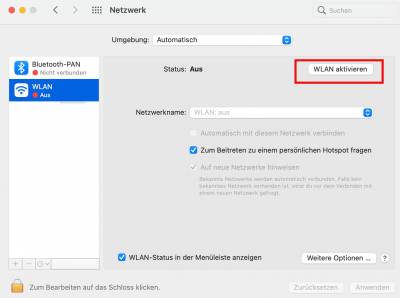
Activate the WLAN card:
And select the eduroam network when it is in range:
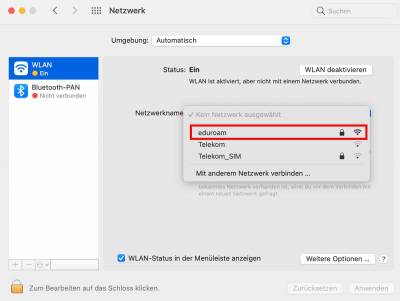
Enter your data center user ID with @uni-freiburg.de (NOT your email address with @XYZ.uni-freiburg.de) and your corresponding eduroam password and then connect:
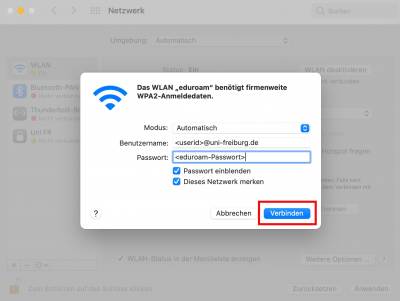
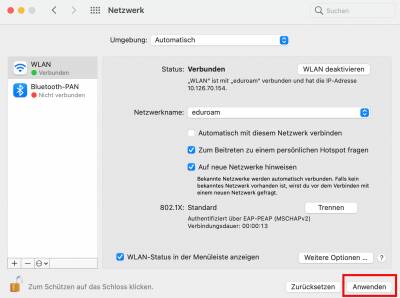
After that, you are connected to the eduroam network and click Apply:
Delete eduroam profile
On macOS, the connection sometimes fails due to an old eduroam profile. To establish the connection, the old profile must be deleted. This is usually the case if you have previously studied at another university and used eduroam there.
Select Profiles in System Preferences:
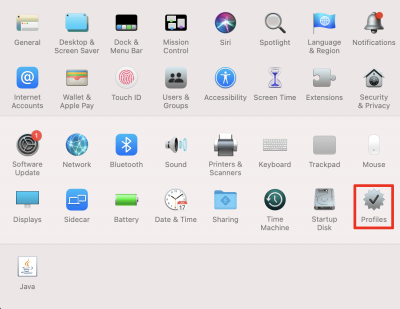 If there is no Profiles button, no old eduroam configuration is stored.
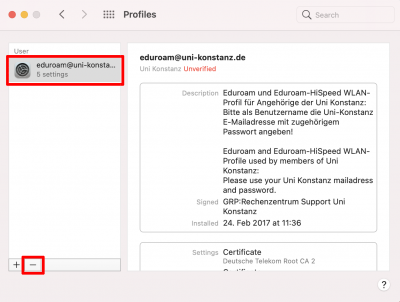
Select eduroam from the left list and delete it by clicking on the minus - (in the example, an old profile from the University of Konstanz)
Edit WLAN networks
Go to the WLAN menu under Network and click More Options:
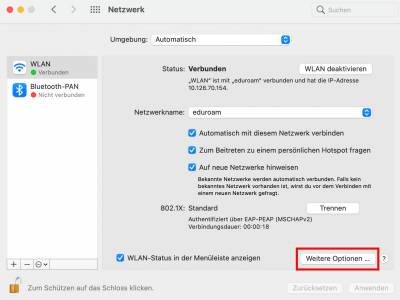
Under Preferred Networks, you will find eduroam:
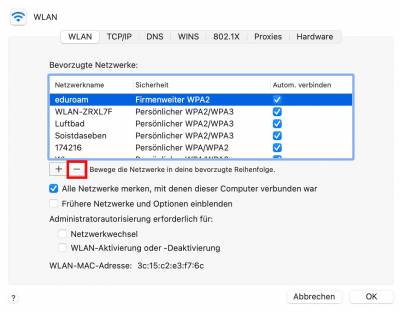
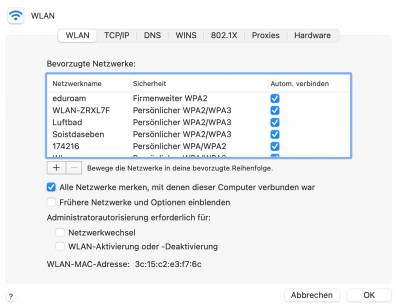 You can remove the Automatically connect checkbox or delete the eduroam network entirely:
Apple iOS
You can find instructions for ios-eduroam.pdf- for iPhone and iPad
iOS - Delete eduroam password
Apple's iOS saves the eduroam password when connecting to an access point. If the settings change, for example for a loaner device, you cannot delete the saved password under the options.
Apply the following method: In Settings under „WLAN,“ select the eduroam network and click on the „Ignore This Network“ entry.
In the WLAN settings, select the eduroam network and enter the changed data.
Linux
NetworkManager
NetworkManager is an application for managing network connections. It is designed to facilitate access to wireless networks.
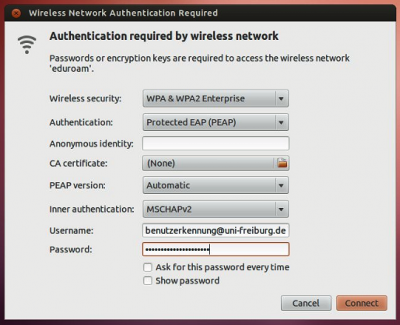
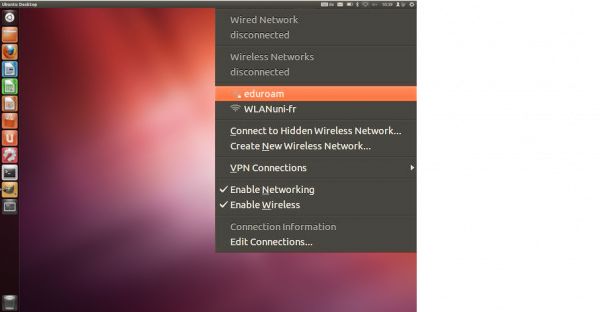
Configuration under eduroam
using Ubuntu Linux (12.04 LTS) as an example
On the Ubuntu desktop, you will see the available WLAN networks.
After clicking on the WLAN network eduroam, the configuration menu appears.
Enter your userID@uni-freiburg.de (it's always @uni-freiburg.de!) under „Username“
and your eduroam password (RAS password) under „password“.
If possible, install the T-TeleSec_GlobalRoot_Class_2 before contacting eduroam:
„CA certificate“: You can download the root certificate at
USERTrust RSA Certification Authority
and then select it from the menu. This allows the validity of the server certificate to be checked when connecting.
wicd
Wicd is a lightweight network connection manager with few package dependencies.
Root rights are required for the following operations!
- wicd must be installed. The tray icon (wicd-gtk) is used for administration. Alternatively, there is an ncurses interface.
# pacman -S wicd wicd-gtk
- Create a wicd template file under /etc/wicd/encryption/templates/:
# touch /etc/wicd/encryption/templates/eduroam
- Open the latter with any editor and fill it with the following content:
name = Eduroam Uni Freiburg
author = schneidm at informatik.uni-freiburg.de
version = 1
require identity *Username password *Password
optional ca_cert *Path_to_CA_Cert
protected password *Password
-----
ctrl_interface=/var/run/wpa_supplicant
network={
    ssid="$_ESSID"
    proto=RSN
    key_mgmt=WPA-EAP
    pairwise=CCMP TKIP
    group=CCMP TKIP
    eap=PEAP
    identity="$_IDENTITY"
    ca_cert="$_CA_CERT"
    password="$_PASSWORD"
    phase2="auth=MSCHAPv2"
}
- Set the template as active:
# echo "eduroam" >> /etc/wicd/encryption/templates/active
- Restart. (Don't forget bookmarks )
- Click on the tray icon to open the connection management interface.
- Open the properties of the desired Eduroam network.
- Check „Use encryption“.
- Select „Eduroam Uni Freiburg“ from the dropdown menu.
- Enter your username (<RZ-Account>@uni-freiburg.de).
- Enter your eduroam password (RAS password).
- For added security, you may optionally select the certificate. Close the dialog with OK.
- Connect to the desired eduroam network.
- Voilà! Internet via wicd and eduroam.
Android
You can use a configuration tool https://wiki.uni-freiburg.de/rz/doku.php?id=wlan-eduroam#wlan_mit_eduroam or manually configure it.
When a network is detected, select „eduroam“. 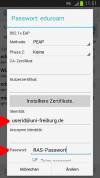 In the settings page that opens:
- Select EAP Method: PEAP (default)
- Phase 2 authentication: MSCHAPV2
Note: Since Android does not check the server certificate with this CA certificate setting, for added security, you should install the T-TeleSec_GlobalRoot_Class_2 root certificate via https://www.pki.dfn.de/fileadmin/PKI/zertifikate/T-TeleSec_GlobalRoot_Class_2.crt and select it during configuration for current Android versions. On newer Android systems, the certificate is already pre-installed, and it is sufficient to enter 'Use system certificate' for CA certificate and 'uni-freiburg.de' for Domain.
- CA certificate: Use system certificates
- Domain: uni-freiburg.de
- Identity: <Uni-Account>@uni-freiburg.de
- Anonymous identity: leave blank
- PW: eduroam password (RAS password)
- Press 'Finish and connect'.
Chrome OS
Select eduroam under WLAN, then the window shown on the right opens. Select the same settings as in the pictures or in the list shown below.
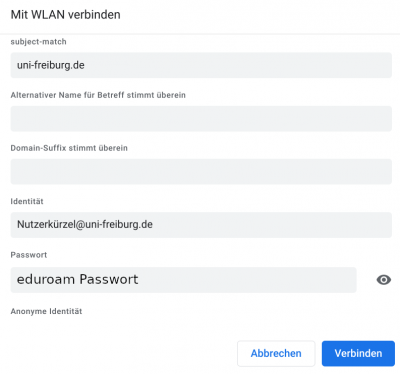
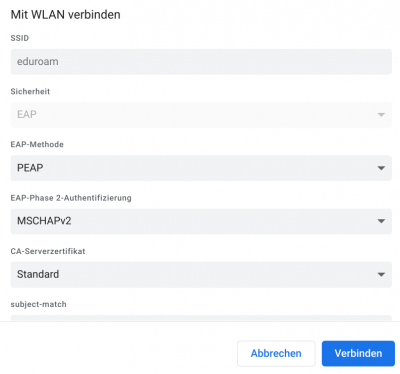 The settings are as follows:
- Security: EAP
- EAP method: PEAP
- EAP Phase 2 authentication: MSCHAPv2
- CA server certificate: Standard
- Subject-match: uni-freiburg.de
- Alternative name for subject matches: leave blank
- Domain suffix matches: leave blank
- Identity: User abbreviation@uni-freiburg.de (NOT the email address with „@XYZ.uni-freiburg.de“)
- Password: Your eduroam password
- Anonymous identity: leave blank
Guest WLAN for the University of Freiburg
Here is a guide on how to set up guest access to the University of Freiburg's WLAN.
LAN connection with eduroam (802.1x over LAN)
In some selected roomsn, you can use the LAN connection at the desk with an Ethernet cable, which you must bring yourself. You no longer need a VPN client to use it.
For Windows computers, you need to activate a system service once:
- Control Panel/System/Administration/Services/
- „Automatic configuration (wired)“
- Start type: Automatic
- Start service
The same data is required for authentication as for using eduroam via WLAN.
If your Windows operating system does not prompt you to enter your user ID and password and authentication fails:
- Control Panel/Network and Internet/Network and Sharing Center/Change Adapter Settings
- Right-click on the network adapter for LAN and select Properties, and then select the „Authentication“ tab.
- Next to the „Microsoft: Protected EAP (PEAP)“ button, click „Settings.“
- Next to the „Secured password (EAP-MSCHAP v2)“ button, click „Configure…“
- Uncheck „Automatically use Windows logon name and password (and domain if any)“ and click „OK.“
If you have authentication problems, please confirm the „T-TeleSec_GlobalRoot_Class_2“:
- Control Panel/Network and Internet/Network and Sharing Center/Change adapter settings
- Right-click on the network adapter for LAN and select Properties, and then select the „Authentication“ tab.
- Next to the „Microsoft: Protected EAP (PEAP)“ button, click „Settings.“
- Under „Trusted Root Certification Authorities,“ select „T-TeleSec_GlobalRoot_Class_2“ by checking it.
- After plugging in the LAN cable again, perform authentication again.
If you do not see an „Authentication“ tab, update your network card driver.
